 pike and predator fishing flies | sitemap | log in pike and predator fishing flies | sitemap | log in
|
 |
||
| This is a free Spanglefish 1 website. | ||
Tie a bullhead
this fly has been developed from the subbug but instead of deer hair its is tied with ep fibre and the head is a bit easier to do than with deer hair although you still get that great gliding action as what has made the sub bug so devastating
Materials
Ep fibre or sf fibre or ultrahair (whatever colours you like)
Flashbou (pearl)
6/0 ex strong Aberdeen
8mm conical eyes
 
step- 1 – tie in a few wraps of thread your starting point is just abovethe hook point and you first set of materials for the body will sit
 
step 2- tie in 4 inchs of white ep fibre on top of the hook then add another 6 inch piece then 6 inchs of flashbou
 
step 3 – add your back colour in this case a light olive 6 inch piece
 
step 4 – next add a four inch piece then a 5 inch piece then a 4 inch piece of the same colour this will then give you the body profile you need
 
step 5 – now its time to start working on building up the head what you need first is to add if you want a throat colour , although if you don’t want to theres no need and you can just stick with white as with the body but make sure the first piece goes on the bottom
 
step 6 – add a 2 inch piece of ep fibre onto the side as above , add the same length on the opposite side of the hook as well
 
step 7 – add you back colour now this piece need to be 3 inchs long so theres 2 inchs extending from the back and one inch forward this helps with the profile shape
 
step 8 – add a couple of inchs of flashbou to either the top middle or bottom whatever takes your fancy you may just want a small bit of flash in the head in which case just tie in one bit on the top or you may want none at all so leave it out
 
step 9 – now fold all the materials back and hold down with a couple of turns of thread
 
step 10 - now repeat steps 5,6,7,and 8 until you get to the hook eye , start each new section tight up against the last
   
step 11 – the two pictures above show what the head will look like before trimming
 
step 12 – the first cut is right across the bottom then turn the hook around
 
step 13 – start by snipping small clumps of ep of (remember you cant stick it back on if you get it wrong) and work round the head clipping as you go

step 14 – this should be you nearly finished the head if you look closely you can see the bits of flashbou inline in the ep
 
this is the throat view note the flashbou
 
and the head view a nice water pushing profile
 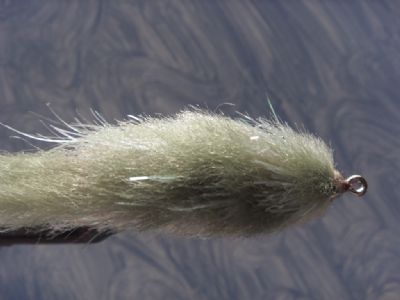
view from the top again note the flashbou
 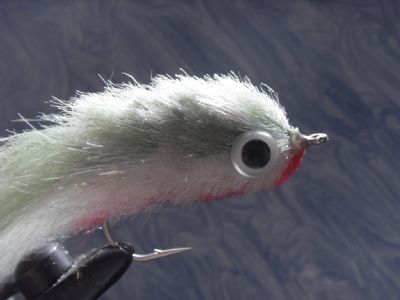
epoxy the eyes in and your done
 
ready to fish 8 inchs of bait fish with an incredible action
|   |
|
 | ||