sandystravels | sitemap | log in sandystravels | sitemap | log in
|
 |
||
| This is a free Spanglefish 1 website. | ||
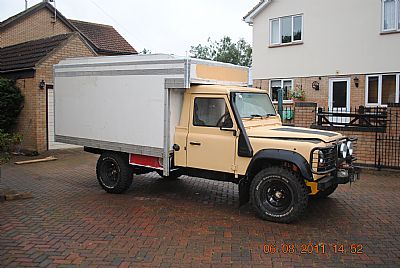
Sandys rebuild  Sandy when we set off for Africa on the 17th April 2009. 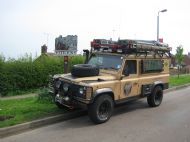
Â
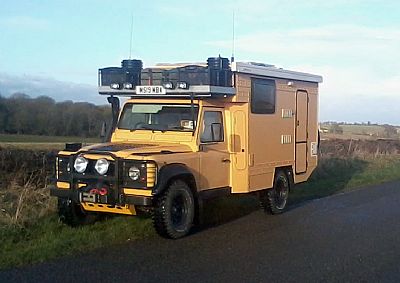
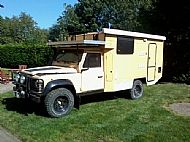
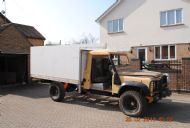
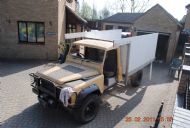
 Sandy as she is now. 29-09-12
Â
Click on photos to go to album.Â
Â
 Always remember ! You Don't Stop Laughing Because You Grow Old, You Grow Old Because You Stop Laughing.
 Â
 The initial brief spec is 3.1mtr long x 2.03 wide with an elevating roof. Height (We must fit into a std ISO container). Solar panels, Fridge, freezer, shower, cooking facilities, heater, sleeping for two and stowage. We will use specially made small wheels for containerising to assist with the height problem.Lots of research to do before starting the build but we hope to start strip down about end of April.19-03-10Sandy is back now so the planning work has started.
 Â Â
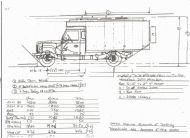
Some where, Sandy is on this boat. Our first job was to find chassis drawings. Now that is a lot easier said than done. But we have managed eventually, although they are not as detailed as I would have liked but they will suffice.In view of how hard it is to obtain them I am going to post all the drawings on the web so that others may use them. Land Rover is so o o o helpful, it made me think about buying a Toyota. (Wash my mouth out with carbolic soap, ugh!!!).The basic plans, wheelbase extension and box for the rear are drawn but it will be subject to change as I go along dependent upon what fittings and materials I can get. The main construction should GRP sides with 25 to 30mm of insulation and then an interior lining. It is hoped to take most of the interior fittings, i.e., cooker, fridge, shower units etc out of a crashed caravan to help keep the cost down.
TO LOOK AT THE CHASSIS DRAWINGS CLICKÂ ONÂ ANYÂ PHOTO. IFÂ YOUÂ WANTÂ AÂ COPYÂ PLEASEÂ FEELÂ FREEÂ TOÂ TAKEÂ ONE
.  Â
 More as we go. (If anybody sees a boo boo, anytime don’t be afraid to let me know. A word wise is a fortune saved.) We will update as we go.26-04-10Work has now started; Sandy is in the garage with the top removed along with the front inner and outer wings, bumper, winch, seats and all the auxiliary electrics. She is starting to look a sorry state.
Â
 Â Â
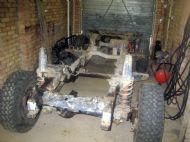
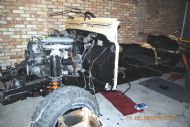
 I have kept the entire engine in one piece at the moment as I need start up to find a power steering fault before I progress any further as once the engine is dead locating the noise will be a no no. The white stuff on the rad etc is the mud from Meremi National park in Namibia. 06-05-10The engine and gear box are out, fuel tank, brake lines and all electrics removed. All that is left is the chassis and two axles, just! So easy to take apart. I just hope it is so easy to put back together. Some hope. Ever so easy to move the chassis without anything on it. Just roll it where you want it. Blasted the chassis off with the pressure washer and I am pleased to say that only two small bits of rust to deal with. The rear cross member is a bit bad, but that will be going anyway.
Â
The engine is on the bench and having removed the head I can see why we were getting intermittent over heating. The head gasket was weeping from no 2 to the water way under pressure. I.e. going up hills. The vacuum, lift and power steering pump are to be replaced along with the cam belt, idler and tensioner bearings. The sump has been removed and the two bolts that sheered in Namibia when we cured and oil leak are now being removed and the bolts will all be replaced. They are 8mm thread but 10mm heads which ring off ever so easy. I will replace with high tensile 8mm with 13mm heads to facilitate better removal in the future as I very much doubt that if I have to take it off again I will have workshop facilities...Next job after the engine will be to strip all the under seal off the chassis for final inspection before a firm decision is made to cut and extend or buy a new 130 galvanised chassis. A hard call as a new chassis is close to £1800.00 but galvanised and preferred. I can extend this for about £300.00. So if it is all solid it will have to be extended. If not I have to find another £1800.00. Ouch!
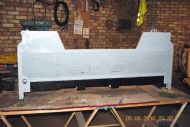
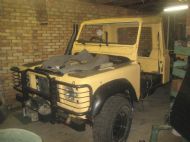
18th June.Chassis is sorted as you can see. All cleaned and painted. Ready to start the rebuild. I have managed to re register Sandy on the original registration number. So I have very little paperwork to sort out with the DVLA. The engine, gear box, transfer box and both axles are checked over and ready to be fitted. So as soon as I can start things will happen very quickly.
28th June.
I have a chassis that can be moved on wheels. What a milestone. I thought it would never come. Now for the engine and gear box, we will see how we get on.
03-07-10
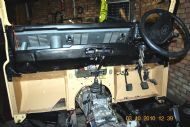
Engine and gear box all fitted and bolted down, we are now starting to look like getting a Land rover back. The bulkhead is now being preped for painting and checking over. So as soon as that is fitted the electrics and breaks should follow shortly.
15-07-10Â
The bulkhead is now fitted, simple. Just 6 bolts and it looks like you have done lots of work. But in truth the work is done before fitting. Found small bit of rust in the passenger foot well that had to be patched but otherwise solid as a rock.Drilled all the ball joints and fitted grease nipples so now I should be able to grease them all on a regular basis. One of the front wings is now fitted, washer system, and all the electrics on that side. Most of the air ducting is mounted but until the steering box is fitted that side is on hold.
.
We have purchased two front wing spats from M+M that are 2†wider than normal to take into account the 30mm wheel spacers that will be fitted and keep the mud from hitting the side of the car so much from the mud tyres. The spats aren’t bad but they would leave a gap at the inner wing to the outer wing if just fitted as they only screw to the outer wing. Not wanting a hole in the wing I have trimmed the outer part of the spat from the inner and will fit the inner to seal the hole. Starting to prep all the water system and the seat box. Mine is corroded quite badly on the driver’s side so I have obtained another one that has some corrosion on the passenger side so two into one will make one good one. Additionally I need to modify it to take two 90 fuel tanks fitted under the seats. By doing this I get the additional fuel I need and don’t have to lift the seats up to access the storage boxes so I can fit better seats. The Defender seats are not too bad but comfort is soooo good.
18-08
Just fitted the last of the air intake system and the front os inner and outer wing. Now ready to fit the intercooler, rad, fan etc. Next will be test the electrics, front lights, and so forth. Not able to do the rears as the loom has been cut to extend it for the additanal length that will be needed.
24-08
Things are starting to get close to start up. It will be with the fuel tank sitting on the chassis for now, but it is very close. Intercooler and rad all fitted and piped up, just the antifreeze to fit.
28-08
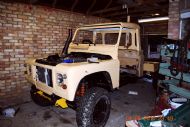
WE HAVE LIFT OFF. Well the engine runs anyway. No more black smoke on start up. When we came home every time we started Sandy up a huge cloud of black smoke came out of the exhaust. It was quite embarrassing at times. But no more. She ran sweet as anyhing, no leaks, no rattles. So so pleased. It was a big moment for us. The tank and battery are ballanced on the chassis on a plank of wood, but who cares! New prop shafts are arriving next week so then she will be driveable. The cab has been undercoated and the first top coat applied in readyness for fitting. Still held up by lack of fuel tanks. We need two Defender 90 fuel tanks and brackets. Short of paying about £400.00 out, it is a waiting game. Next item on the ajenda is to tidy up the dash and refit everything after checking it over. More later, this happy bunny is going for a pint or two.
4.4-9-10
All the lights are sorted, well the front ones. Had an electrical problem with the pre heat not working. Took two nights to find the problem. In the end it was the relay that had a terminal bent over so neatly that I thought is was supposed to be like that. Once it was straightened out everything worked fine. It’s always little things that seem to take the most time to sort out. But they have to be done its no good leaving them until later as it is always harder to come back and fix it later on. Cab is repaired and painted with the first top coat. I am painting most things before they are fitted so that everything has a coat of paint. When fully assembled I will repaint with the final coat. The tub has been cut and trimmed to form the base of the back of the cab. Had a test fit and it all goes together quite well. The rest of the tub I will keep for now as it is a good source of alloy sheet for modifications. The cab has been striped back down to finish off and trim the base section before painting. We intend to cut the back of the cab to give access into the body but I am not sure if I want to cut it now or when the body is ready. Have to think about that for a while.New prop shafts ready to fit. Purchased from Bailey Morris at Eton Socon. Best props going and not over expensive especially as they have 30d angle on the flanges.
9-10-10
The cab is fitted, after some thought we did cut the back of the cab out using the rear window as the line. It all went together quite well.
  A A few little hiccups but that’s how it goes. The two fuel tanks are checked, painted and ready to fit under the seats. The passenger side will not fit in as a standard fit so some modifications will be required. Hopefully I will get the steel to make brackets up next week. My hope was to link the two 90 fuel tanks together with the 70ltr as a top up tank. But not sure yet just if this will work or if I can fit the 70ltr in the chassis forward of the rear axle. I have purchased two Disco fabric seats for the front so this should make life a little more comfortable when driving. Hope to resume work next week sometime when the decorations in the lounge are completed. A A few little hiccups but that’s how it goes. The two fuel tanks are checked, painted and ready to fit under the seats. The passenger side will not fit in as a standard fit so some modifications will be required. Hopefully I will get the steel to make brackets up next week. My hope was to link the two 90 fuel tanks together with the 70ltr as a top up tank. But not sure yet just if this will work or if I can fit the 70ltr in the chassis forward of the rear axle. I have purchased two Disco fabric seats for the front so this should make life a little more comfortable when driving. Hope to resume work next week sometime when the decorations in the lounge are completed.3rd Nov 2010. Back to the play room, (the garage) and working on Sandy. The first fuel tank under the driver’s seat has been fitted into place. The second one to go under the passenger seat has to have a few mods done before it will fit. the filler neck fouls the cab mounting brkt, so it has to be moved. Simple job of cutting off the filler neck, blanking off and re fitting the neck on the side. I was told that the auxiliary tank will not fit under the passenger seat. We will see! I think everything is possible, it's just if you put the thought into it. Refitted the dash and fuse box so things are starting to go quite well. Once the second tank has been modified I will pipe them up and move onto the floor and seat box.  Â
8th November 2010
Thats it, proof. A second tank will fit under the passenger seat, but it’s not a job for the faint hearted.  (Why didn’t Land Rover make one to fit, I am sure they needed one for the Camels). The filler neck has to be removed and refitted onto the inside face. The front cab mounting bracket has to be scalloped out and the front corner of the tank cut out and recessed. Then you have to make a bracket from the chassis to the outside cab runner. Easy now I have done one, he said after 16 hours of cutting grinding and wielding.  But I am pleased with the result and the time is only my time that I have put into making what I want. (Did I tell you that it’s my birthday on the 11th, no present’s thanks, just cards or leave a message on the web site).  I now have to tackle the job of piping both tanks up into a single filler neck and wiring them into the loom with fuel tank gauges.  Probably another marathon but upwards and onwards, it’s slow, but like the turtle it keeps moving steadily and will get to the finish line sometime.  20th Nov 10.                                                                                        Work has been a little slow recently with everything getting in the way of me working on Sandy. With just being laid off work I should have a little more time until I find work so progress should be a little quicker.
Â
20th Nov                                                                                              Work has been a little slow recently with everything getting in the way of me working on Sandy. With just being laid off work I should have a little more time so progress should be a little quicker.                                      Â
Â
29th Nov.
Famous last words, work should be quicker. If it was not so ccccccccold, it would be. Â It is like working in a freezer and everything takes so long, some days its just toooooooo cold. But some progress has been made abet slow. Piping for the tank filler has been sorted. The transfer pipe work is nearly complete. Front bumper has been stripped and repainted. The spot light mount has to be relocated as it is too low for the winch control box. Â The front winch has been striped, re built and the control box checked over. Â Lots of bits done but nothing showing. Hopefully I should soon be fitting the seat box. I have made a cardboard dash consul as a template to make the proper thing.
Â
I just find the price to buy one is a little excessive. Time costs me nothing and if I can save £70.00 in the process, so be it.   24th Dec, Not a lot happened, few bits, made the centre consul, mounted the twin front shocks, fitted wheel spacers, and wired the winch, front
spots, fuel tanks wired in with transfer pipe to fill the main tank. All tanks will work through the main tank under the driver’s seat. They will fill individually but transfer fuel to the main tank via electric pumps. Problem with the 2†lift blocks, they throw the front axle out of alignment and cant it forward to such a degree that I have to do something with it. The Panhard rod needs to be extended to bring the front axle back to centre, the front radius arms either need bending or the axle bolt holes re aligning to bring everything back to how it should be. Reading different forums they say 2†lift dose not change things much but thats not right. So it will have to be changed until it is right.  Looking at the photos it looks like nothing has been done but slowly slowly, its coming. My target is to have the chassis completed and ready to start the bodywork by the end of January. Â
 OK it’s optimistic but you have to have a target, even if you can’t see the dammed thing. 6th Jan 2011. Happy New Year everybody. After the festivities it’s down to get some work done. It’s still very cold. Paint takes 2 to 3 days to dry.  Using spanners is like working with blocks of ice.  Everything is so cold. The heater is great but it never gets chance to warm the metal up. But the deadline is set so it has to be done. The cab interior will be going in next, seat box, floor, and seats. Yes seats. I have purchased a set of Disco seats so they should be a lot more comfy. The original seats were much better than anticipated, but more comfort will be good. I just have to work out how to fit them.   The rear cab windows have been blocked off and sealed. Twin shocks to go on the rear axle. I have fitted the brackets onto the axle but it means that the exhaust has to be reworked and if it has to be changed it could become a major headache so I have ordered a new set of mounts to fit to the original mounting points and will remove the ones I wielded to the axle to hopefully save problems in the future. 1st Feb 2011 I made it with Sandy out of the garage and running. But still lots to do.
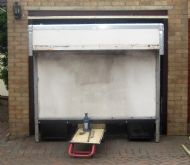
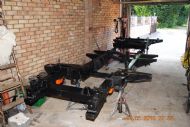
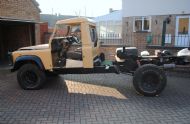
   The 2†lift is causing more problems than its worth. It looks good but that’s about all, its just bling. When you read the write ups so called experts say just fit the lift and no further mods are needed. What a load of tosh!!. To do the job correctly you need to crank the rear radius arms, double crank the front ones, if not the bushes will have a life of 12 months and your steering will be all over the place as the caster angles will be way out not to mention the prop shaft UJ’s that will all be running at different angles. A longer pan hard rod will be needed otherwise your front suspension is off centre. 2†blocks will also be needed for your rear anti roll bar and centre trunnion on the rear axle other wise that is all out of alignment. In short, I have taken it off and left the height standard. It really is not worth the effort when I consider that on the last trip it went everywhere we wanted without a problem. Ready to fit the double rear shock absorber brackets, which is fairly straight forward but as I fitted the additional bracket to the axle for a second shock absorber I now need to remove that by cutting it off, make good and bolt the new brackets into place. It looks like removing the axle to make the job easier. At the same time the  new rear half shafts will go in along with  the heavy duty drive flanges and 30mm wheel spacers. The cab rear has had to be cut out further than I would have liked as to gain the benefit of the better seats you need to recline them further than you would be able to.  Once the body is fitted and bolted to the cab the integral strength should be replaced. Fitting the seat was a nightmare as you still have to make it so that you can access the tanks in case of leaks etc. Special brackets have to be made to span the covers and mount to the seat sliders. It takes about 8hrs a seat so not a quick job. But worthwhile in the end. I have insulated the seat box inside and out to try to keep some of the noise out and will do the rest of the cab floor and bulkhead later.  18th feb 2011. Purchased a GRP Luton body to cut down and mount onto Sandy. This will form the base for the living box on the rear. Far too big at the moment but in the process of dismantling ready for rebuilding. First step will be to make the sub frame base and mount all the brackets for the water tanks, fuel tank, and anything that is to be mounted into or on the chassis.
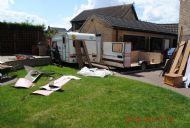
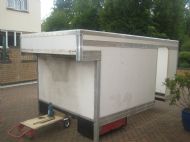
   5-3-11 The box is now dismantled into the base panels and the sub frame all dismantled.  All the alloy sections have been saved for re use. Not much will be thrown away. Unfortunately the floor was 18mm ply, far too thick for me to reuse so that will go into the store room as shelving. The basic sub frame is built and 50% wielded together. It’s slow going as you have to work out the mounting brackets, (land rover have a system of bolting front and rear and resting the centre on pre fitted mounts. Not sure that will work in this case but I need a fixed mount at the front to join the body to the cab and still make it flex in the middle. But I need to ensure that it is secured so that it can’t bow out in the centre. and make the whole base strong enough  to support the body.  In addition I want to mount two 100ltr water tanks, one on each side. Another fuel tank, waste tank, batteries and stowage lockers. It makes for a lot of looking and thinking how things will fit. In addition I also need to fit insulation into the floor around all the pipes and wires. Happy days. Hopefully when the base is completed I am hoping to be able to build the body in the workshop on the floor than roll it out and mount it outside. It all depends on the height. I think it will go but I will only know for sure when the base frame and bulkhead is built. Photos to follow shortly.  On the positive side the mechanicals are all ok. Just a small blow on the exhaust manifold. It’s a pain but quite easily fixable. I had a problem with the engine temperature going up quickly but it turned out to be a faulty sender unit. So much for new parts! Thanks Martin, your help and advice is invaluable as always. I can manage most things but when in doubt, ask! And it’s normally Martin who gets the questions. More later. Well we have our caravan, in fact two. one for the interior fittings and one for the lifting roof which when transplanted should be much more sturdy and lighter that we could have built, but much more impotaint it will be watertight. When the two are transplanted we should have everything that we need and a few creature comforts to boot.
17-8-11 It has been a little time from the last update but time just flies past. However, the body shell has been built and the lifting roof fitted. It all works remarkably well if I do say so myself. True I did have some help taking the caravan apart and fitting the roof to the box. Thanks Jim, you saved me a lot of work with your idea. It just shows that two heads are better than one. We stripped the caravan down to the basic chassis and sold all the bits not required on E Bay, including the basic chassiscso I have freed some room up in the drive. Only one more caravan to go. The body came out of the garage with about an inch to spare. My mates thought it was bloody good luck not to have to take the gable end down to get it out. I thought it was precision engineering.
We had to remove the gearbox from Sandy as the lay shaft had a slight rumble so better now than later. Two new bearings later back in it went. I am now getting quite good at fitting land rover gearboxes and transfer boxes. I hate that job with a passion, but it had to be done. The doors are nearly ready to fit and that just leaves the seat mount to be completed before Sandy comes out for the last time. Hopefully we should mount the body within the next two weeks. So much has been done that I could spend days writing it up but to save the boring you all I will leave it short.
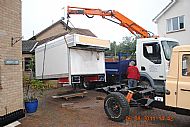
   22-8-11 We are getting closer to Sandy and the box body becoming one. The seat mounts are completed along with carpeting the seat plynth. Subject to time the doors will be fitted on Tues. As I then have to work until Sat night nothing will be done until Sunday. So next week is looking good to mount the box!!!!! 1-9-11 Doors fitted, with a little bit of help from Noel, poor chap he only came to see how Sandy was progressing and ended up helping. Thanks mate, evry little helps. Just a few more bolts to tighten and we are ready to take out of the garage to mount the box. 5-9-11 Well as always it turns out to be a little more than a few bolts. But out of the garage she came. Hopefully, in the morning the box goes on. 6-9-11
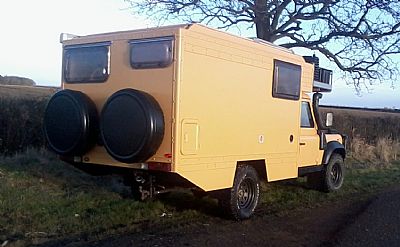
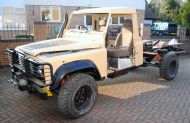
The box is on. it fits perfectly. You would be forgiven for thinking in had been made for this vehicle. But what a relief. Now the work starts to fit it out. First I have to secure the mountings and ensure that all the underside is completed. Meanwhile, it looks good.
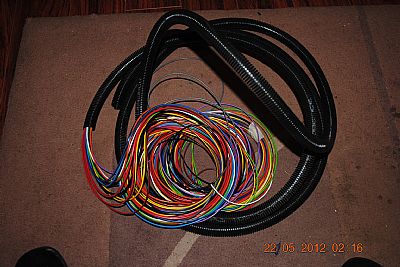
  26-09-11 Made quite a bit of progress this week. took a week of work and hit it hard but it still does not look a lot for a whole week. Rear part of the floor fitted, spare wheel mounting, rear toilet window and cassett door for loo all fitted with some of the insulation and lining. Hope to get the bathroom finished sort of this week. 07-10-11 Making progress, shower cubicle, toilet and sink/cooker unit fitted. The cooker/sink unit was a little big for the space avilable so I had to cut it down by 2 1/2" to make it fit and as always its not that stright forward. But we keep going and get their in the end. Photos on Picasa, click on any photo. 6-11-11 Work has been continuing, abe it slowly. Some days it just seems like you are working solid and have nothing to show. Couple of set backs. A second hand fuel tank is leaking, it would be the one under the passenger seat. This was a bit of a sod to fit and will be a major job to remove and replace. On ballance I am thinking of removing it and fitting a custom battery box that will hold all three batteries. We are now looking at having a, 50ltr, 70ltr, and 100ltr fuel tanks so oneof the two 50's can go giving us 220ltrs with a range of about 1200 miles (2000kl). The side wings I had made to flare the body to the cab did not fit. While I made them fit, it did not look the part so two more have had to be made which now require cutting and fitting, my fault not the people who made them.  On the plus side, the last section of the floor is cut out ready for fitting. The roof issue with the side of the roof catching when dropping it down is resolved. The sink, cooker unit is fitted. I have the new rear suspension to fit, new hd springs with air bags. Hopfully, we should be soon fitting the remainder of the interior soon, then it will be wiring, gas and water. Soon could be looking at an MOT. Whatever next!!!!. 18-12-11 Well its now Dec, I had expected to have Sandy completed by now. However, she is well on the way, but the urgency has now gone. It is quite hard to get motivated as I know that we will not be going to Aus. All the interior is now insulated and lined, seats/bed is made, fridge unit is close to completed. On Monday I will get the floor covering. Once that is laid than it will all go together quite quickly. 23-12-11 Floor is laid, seats all finaly fitted, fridge unit yet to fit. But will have to wait until after xmas now. Lots of photos to come over xmas. 27-07-12 What can I say? I have neglected this site totally for the last 6 or 7 months. But in truth I did have much higher priorities. Work has re commenced and Sandy has moved forward at an alarming rate. All exterior lights are now fitted and working. This entailed building a new loom to join up with the original one that ended half way down the chassis. Fun and games was had by all.
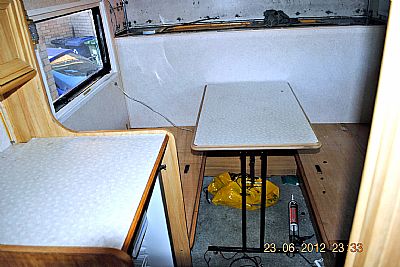
The Webasto heater is fitted. 100 ltr and extra 50ltr diesel tanks both installed and piped in with pumps to transfer derv to primary tank. Water filter, pump, and tank piped up. Gas pipes installed up to the bulkhead. Table made that drops down to make part of the bed.
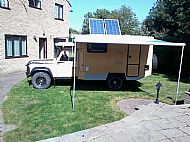
Interior electrics and 240v system all installed. Two 100w Solar panels ready to be fitted, just waiting for the angle to mount them. Fridge installed and working. Soon a bit of welding, side panels over the tanks and air suspension to fit. Roof rack, jerry can mounts and gas bottles to fit and we will be close to lift off. More photos uploaded, click on a photo to go through to the album. 12-9-12
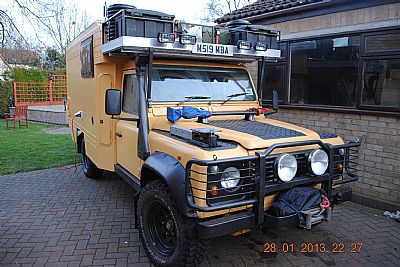
More work been done. Roof rack made and fitted, solar panels now on and working, true I have to make the stays to keep them upright for when the sun is low. But they are pumping out the juce. i had a bit of trouble with the controler, I foolishly disconected while it was pumping out the juce and did not cover the panels first. However as the controler had been good I elected to replace with the same one a Sollatek Sunpower 30. They may be dear but they are good and it was my fault.  www.sollatek.com Started on the new centre consul. Elected to go for a Rapter Engineering consul and dash mounted pod. they are engineered so well. Things are coming together. Lots of photos on the album. 29-09-12 Still fitting the dash, or more to the point the electrics in it. it is looking quite smart but I had not anticipated the work involved in chat i wanted. I have fitted air bag helpers, made by Air lift. Do be careful If you go down this route, the top mounts have a habit of pushing up through the top spring mount. I will show the African mod that cures this problem as in UK they do not admit to having any issues. Where I bought them from RST-Landrover they have been less than helpful in resolving the issue. If you read this web page http://www.airsprings.cc/4x4/Airlift/AL1000/LAN02.MN285.738.pdf  you will find better instructions and a way of sorting the problem before it happens. Mine pushed through before I went on the road. Never drove it. It cut the packer and it was unusable. I ended up due to the messing of RST having two Stainless steel packers made with a wider lip. So be careful who you buy from. Main problem is the lip is too narrow. But see for yourself. Moving on, fitted the gas bottles on the roof, I have covered them in with some large pipe as ferry and tunel companys throw a right wobbly when they see them. out of sight, out of mind. 13-11-12 Things have once more moved on. Sandy is as I write in a large garage getting a coat of paint. Looking good. Lots of little jobs being done, map reading light fitted, cab light fitted, roof insulated inside ready for the hard cover then a cloch/fabric cover. Rear mud flaps ready to fit. Used her last week end and spent the night out. Everything worked fine. Just a niggle with the solar charger and the fuel guges that refuse to work the correct way but we will persevere. The rear winch is next to get a little attention and be wired and fitted. Upwards and onwards. But its good to be able to drive her about. 25-11-12 Rear winch wired and fitted, only a 2.5 tonne winch but working on it will be pulling it out as it went in with a snach block I hope that it will have enough pull. The trick is not to have to use it. fuel guages all sorted out, both work the right way. Just al ittle ajustment to the wiring loom I made. Solar charger re set and working. I must remember to cover the panels up before disconecting. I have started on the mossy nets and blinds. They are all from the doner caravan but each one has to be cut to size. So a complet unasemble, trim and rebuild on each one. But working on the fact that they are something like £70 each its well worth my time. Next job is to line the roof interior with fabric. Will see what it is going to be when I get to the shop. soon be close to a few days away. I will take some photos when the rain stops.  12-12-13 Happy new year to one and all. Had a break over Christmas but back at it now. The dash is finished at last. Had to alter the wiring to accommodate fuse boxes on the exterior. Centre shelving is done at rear of the cab. Need to lift the roof of again, it is too heavy with the reinforcing. so adjustments have to be made. It works perfectly but too heavy to lift easy. Need to remove the box section and re[place with a pressed section that will be far lighter. Not looking forward to this job but it has to be done. 13-02-13 Roof has been stripped out for the third time. All the steel box has been removed and much lighter pressed section fitted. Re insulated and lined the roof is refitted and is now ok. Still a litttle heavy but managable. Cab finished with curtains, fire ext, first aid kit fitted along with new door locks and interior door trims.
Wheel covers fitted at the rear, winch cover, tool boxes on the roof rack etc, high lift jack onto the bonnet and vice holder on the front offside wing. (see new photos on gallery).
80 mile test run completed. Next run to Winchester. All ok dso far but we will see. 18-3-13
Run the Winchester completed, no problems. Sandy ran like a clock. She cruses along at 55 quite happy at 3000 rpm. Pulls up the hills fine. So all in all very happy. It was never intended to be a racing car and she is never going to be that.
|  |
|
 | ||

 Â