Cromarty Vortex | sitemap | log in Cromarty Vortex | sitemap | log in
|
 |
||
| This is a free Spanglefish 1 website. | ||
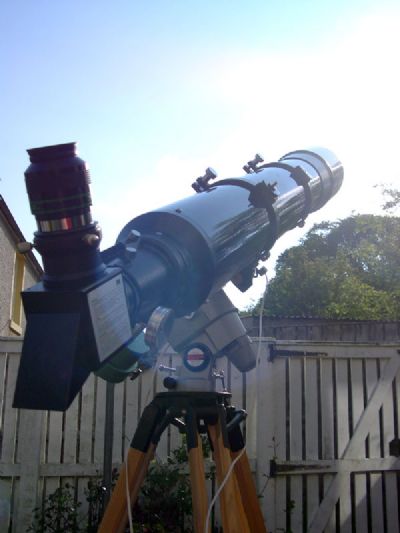
IntroductionUpdate 27/02/12Project HeliosBeing a lover of refracting telescopes, it's perhaps no surprise that one day I would end up with a "great big" one. I consider 6-inch aperture to be quite big, and the market has several varieties of 6-inch f8 achromatic tubes to choose from. These "Yardcannons" as they came to be known on the Cloudynights forum combine big aperture with obstructionless optical systems, along with reasonable build quality and good optics. Oh, and they come up pretty cheap on the classifieds too! The model I ended up with is the Helios 150. It's one of the older ones with a non-collimatable lens cell. I was lucky enough to be able to speak to the person who owned the 'scope before the current seller, and he described it as one of the best lenses he'd looked though. Some discussion took place with the seller, a member of the stargazerslounge forum, living in Edinburgh, and I ended up meeting her at Aviemore for a "try before you buy" loan of the 'scope so I could see how I'd get on with it. Having got it home, I was able to test it on solar duties within a few days. Using the Baader Herschel Wedge the view of the various Sunspots and granulation was very impressive, though the focuser had very little in-travel which made it impossible for most of my eyepieces to focus when used with the wedge.
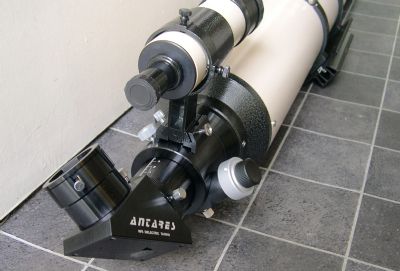
It's a big old thing but not too unwieldy and the GP mount seemed to cope with the weight and length no problem. Focuser jiggle was noticeable, but a new focuser would have to be forthcoming if I kept it anyway. The condition of the tube was generally all ok. The paint was a bit old looking and had been touched up in a few places. The dewshield had been flocked on the inside, as had the OTA, back to the first baffle - a good feature. The 'scope came with some accessories too, including a nice 9x50 straight-through finderscope and bracket. This would be handy to keep as the extra weight added to the back end would make it easier to balance the scope closer to midpoint along its length, as the scope is inherently nose-heavy. Those two 6" diameter lenses weight a bit, as does the long steel cell!
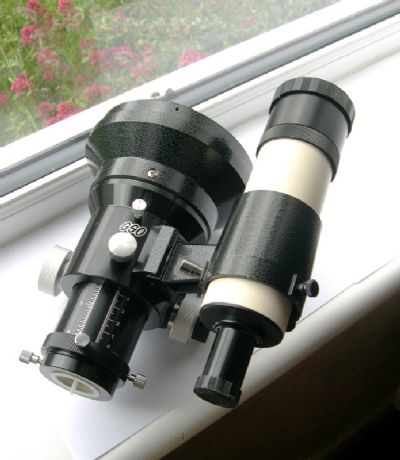
A few days after the above pictures were taken, I'd made a start. The first thing I did was invest in a new Crayford focuser. I wanted something with a shorter body than the Helios R&P so that more of my eyepieces would come to focus when using my Herschel Wedge. Hefty would be good too as I wanted to add some back end weight to allow me to mount the tube further forward on the mount. Dual-speed? Yep. Smooth as something very smoooooth? Yep. Affordable? Relatively. I went for one of these: http://agenaastro.com/gso-linear-bearing-refractor-crayford-focuser-96mm.html On arrival a couple of weeks later, I was impressed at the build quality, the smoothness and the simplicity. No tiny little adjustment screws to adjust the tension - just a big finger knob underneath for tension and a big one on top for locking the drawtube. The rotation feature even works smoothly - something lacking on other focusers in the same price bracket. By the time the focuser had arrived, I'd had the telescope tubes stripped of paint (sand blasted by a wheel refurbishment company in Inverness called Rimtech), primed and partly painted in Ford Ivory from Halfords. I'd finished the finderscope, so I was able to attach it to the new focuser to see what the back end would look like.
Looked pretty nice, I thought! That ivory colour seemed to go with the mottled grey of the Helios fittings well. Shortly after this picture was taken I managed to put a further few coats of paint on the other tubes (the main tube and the dewshield). I actually lost count of how many coats I put on! This is because I only applied very thin coats, but lots of them with 20-minutes or so between coats. I way underestimated the amount of paint I'd need. I'd originally though two tins would do it (HA!) but ended up using five cans! I had very fine (1200 grit) wet & dry sandpaper handy too in case of problems, and had to use it on occasion to smooth out a blob or a streak between coats here or there. Anyway, "several" coats later, and after a few days of curing time left next to a heater in a warm room (aint summer great?) I started on the lacquering. Basically the same technique as applying the paint, but a lot smellier! Two thin, eveny applied coats with 20-minutes apart. The lacquer tended to apply a "thicker" looking coat than the paint so I was careful to only go round the entire tubes once before leaving to dray and applying the second coat. Then they were left for another few days while I found some nice lettering to replace the stickers that had been blasted off with the original paint. Merely a cosmetic point, but I think the big old tube needed some lettering to draw the eye from the "bigness" of it, so I found a company on ebay that would provide me with the text I wanted, in various fonts and styles, and all for a couple of quid or so. Vinyl and on self-adhesive strips, it was quite easy to apply but took some time to make sure I did it right. I decided on another coat of lacquer over the top to hold it firm and give some protection...
With the lettering at the front of the tube applied too, it was back into the shed for the final lacquer layer... and near disaster! Halfway through the process I noticed that I'd just sprayed over a hair - and it was now stuck into the sticky fresh lacquer! AARGH! Right at the very last step! I decided to leave it to dry hard and then try and sand it down, relacquering if necessary.
Later in the day (after half an hour with a hot hair drier to speed up the hardening process) I carefully "attacked" the small hair with some wet 1200-grit paper... and it worked! The top layer of lacquer containing the hair came away fairly easily and no marks were left! Phew...
With that done, the painting was technically finished and the telescope could be reassembled... carefully! That's what I'm about to do now, but my one concern is that when I remove the masking tape, will there be debris and dust inside the tube from the sandblasting process? Have to go now and find out...
Well, there was some debris and dust inside the tube, but careful use of sticky masking tape and the vacuum cleaner removed it all and left the interior clean again. Some little bits of flocking material came away when the masking tape was removed, but the majority could be replaced with offcuts I had lying around.
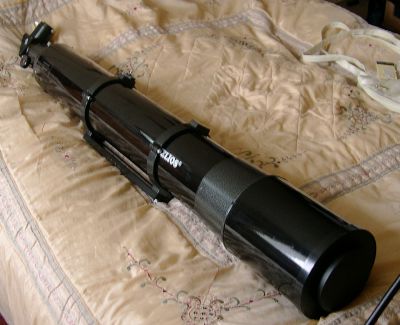
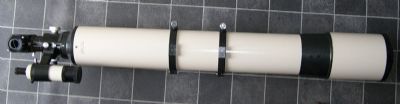
So, here it is! The finished "Helios 150 Special"!
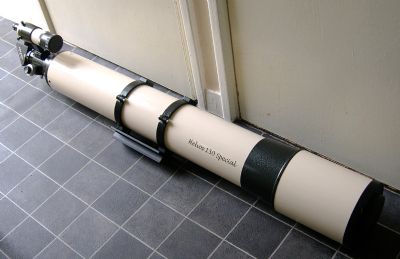
It's been a lot of work, but it's now ready to use - or at least it will be once it's been left for a week or so and has had a coat of car wax put on it to protect the finish, and had the collimation checked, and when I've decided where to mount the Telrad, and.... does it ever end? ;) Update 27/02/12Time has passed. The telescope has been used. Views have been enjoyed. Issues have been found. The Vixen GP mount that I use with all my 'scopes perfroms perfectly adequately with the hefty Helios on it, but I know it's at its limit. In the back of my mind is the knowledge that it's always best to have some "headroom" when it comes to load capacities, in case of nasty events happening. For that reason I'm now awaiting delivery of my brand new Skywatcher HEQ5 Syntrek mount! The Syntrek has a quoted payload capacity nearly double the GP, at 15-18kg (depending on where you read it) which will easily accomodate the Helios's 10.4kg. The 'scope's weight is soon to increase though... ...when the Moonlite dual speed Crayford focuser I ordered for it arrives! Yes, the GSO Linear focuser was a needed improvement over the rack & pinion (primarily for spacing issues rather than anything else) but the drawtube on it is so short that the constant fittin and removal of spacers when I change eyepieces soon got wearing. The Moonlite has a 4.5" drawtube - more than enough to accomodate all my eyepieces from 42mm 2" wide fields to 3.9mm modified Orthoscopic. Maybe both parcels will arrive today? Unril they do, the performance of the 'scope has been excellent. On 15.01.12 I enjoyed the best views of Jupiter I've ever seen with my own eyes through a telescope. If I remember correctly, magnification was about 307x at one point and more routinely 240x, with exceptional disc detail apparent. False colour was extremely well corrected too. The 'scope's objective has been professionally cleaned by Orion UK in early January, resulting in better clarity in cold conditions. I suspect that some residue from my own cleaning attempt was left in place on the lens surfaces. This resulted in snowflake style patterns appearing on the objective in cold or dewey conditions. That artefact is now gone and the view remains clear throughout observing sessions. |    |
|
 | ||