 Glenmutchkin Light Railway | sitemap | log in Glenmutchkin Light Railway | sitemap | log in
|
 |
||||||
| This is a free Spanglefish 1 website. | ||||||
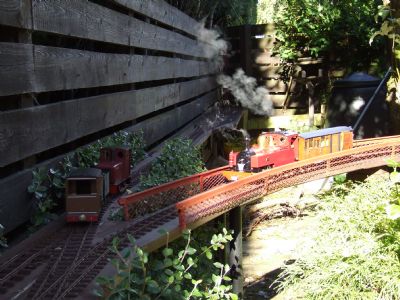
BUILDING A VIADUCTI used this method to build a curved and inclined viaduct 29 inches above ground at the highest point and 20 feet long. The result may not satisfy the purist but it has provided a cost effective means of building a garden railway on a sloping site. It has survived both of the longest, fiercest winters of the twenty years that we have lived in our current home and also being tripped over by one of WoSG's members having some kind of senior moment.
The materials used were all purchased from B&Q but should be available from any decent sized DIY shed. The quantities will vary according to the length of viaduct required. 6 inch wide decking boards for trackbed. Referred to in the text as Boards 40mm diameter Black Polypropylene waste pipe. Referred to as Pipes Ready mixed concrete in 25 kg bags. Common bricks – the type with 3 holes on them. 1” x 1” timber. 1” round head black woodscrews Tools required – A spade, lump hammer, small spirit level, cold chisel, old bucket for concrete mixing, trowel, hand saw, drill, screwdriver, Stanley knife, mitre box. A laser spot spirit level is useful but not essential. By a happy chance 40mm pipes fit very snugly into the holes on B&Q common bricks and this led me to use the following technique. If it is not original and I have subconsciously pinched it from some long forgotten article in SMT or elsewhere I apologise unreservedly. Start by digging a cube shaped hole 12” x 12” x 12” centred on the required location for the column supports. The bottom 3 or 4 inches of the whole is filled with rubble, broken bricks etc. which is bashed with a lump hammer to consolidate and approximately level. The next step depends on how many columns you wish to use together. Two pipes look right as supports for a six inch wide decking board. Three pipes look fine with a double width of board. If you are using two columns cut the brick with a cold chisel and hammer. For three columns use a whole brick.
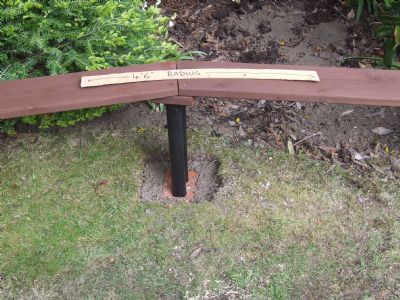
The brick is placed centrally on top of the rubble and levelled in both directions using the wooden handle of the lump hammer and a spirit level. Ready mixed concrete is made up in a bucket following the manufacturer's instructions. Taking care not to move the centred and levelled brick, pour the concrete into the hole around the brick up to the level of the top of the brick. Avoid getting concrete into the holes in the brick. Using the straight edge of a scrap piece of wood tamp down the wet concrete. Cover the concrete with polythene and allow to dry for a couple of days. The pipe lengths required are measured by push fitting them into the holes in the brick, checking for vertical, and marking up at the height required for the bottom of the boards. Where the columns are going to support a joint in the trackbed it needs to be shortened by the thickness of a second, short piece of board which will be used as a connector and support for the two main boards. The pipes should be cut carefully to ensure that the ends are square. I used a hand saw and a mitre box. Cut a two inch length of 1” x 1” timber and shave the corners with the Stanley knife until it is a tight fit in the top end of each pipe. Push the the timber wedge into the pipe until it is flush with the end. Drill a hole through the pipe into the wedge and fix in place with a screw. Replace the pipes into the holes in the brick , lay the appropriate board across the top and double check for height. If happy mix a further batch of concrete and pour into the foundation whole until flush with ground level. Ensure that the pipes are vertical and cover the concrete while it dries.
Site Last Updated - 26/08/2015 09:15:33 | ||||||
 | ||||||
 Start by deciding where you want your viaduct to span. Straight is easier than curved. The former just requires you to measure the span and decide on the number and positions of columns. My viaduct has a longest span between columns of just over 5 feet but in the future I might get round to putting in intermediate columns for looks rather than structural need. There may be conditions at ground level which make siting a column on a specific spot difficult if not impossible. Curves are achieved by using lengths of decking board in “threepenny bit” formation. The shorter each length, the smoother the curve but the more supports needed. I laid out boards on the ground below where I wanted my viaduct to run, adjusting angles until I was satisfied and marking the sites for the columns with pegs.
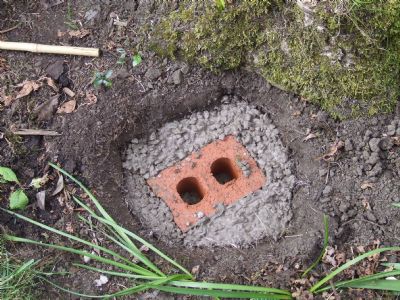
 When all is dried and solid the boards can be laid and fixed with screws into the top of the timber wedges inserted previously into the top of the pipes. Where the columns support a joint don't forget to fix a short piece of board on the top of the columns and then fix the main boards to that piece. If laying a curve the threepenny bit effect can be alleviated a little by filling the inside of the corners with fillets of board cut to fit. I use brown silicone frame sealant to fill the small gaps between boards – it is hardly visible against the dark oak treatment that I use on timber work.
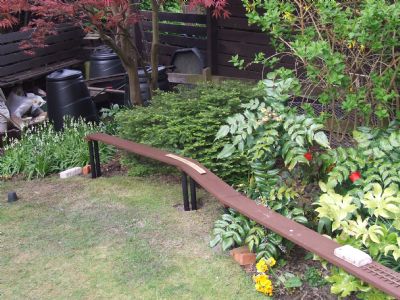 Once the track is fitted you should have a solid structure but one that looks a bit precarious. I stumbled across lengths of plasterers' stop while looking for something else. This is a galvanised mesh with a U profile edge. It is strong enough to stand on edge supported every 2 feet or so. It comes in three metre lengths and if you are careful can be bent into a curve. One sunny day I discovered by accident that it is much easier to bend when it has warmed up a bit. When painted it makes a passable guardrail which can be fitted to the basic viaduct.