
Ant Nests or Homes for your ants.
An ant nest in the wild is called a Formicary. This is taken from the old language of Latin, which is often used along with ancient Greek to classify and identify practically all species of plants, animals, insects etc. Any type of ant set-up that you may choose to use is referred to as a "Formicarium", whether it is a ready made one, or something you have made yourself, such as the ones sold in the UK called "ANT WORLD", or a plaster type nest. Many kinds of containers can be used to house your ants in. The most important thing is, it must be escape proof and also transparent, so that you can observe the ants without disturbing them too much! My own personal preference is for the kind of upright double glazed window, with 2 clear sides made from glass or plastic. My wife does not object to my keeping ants; but she might do if she found them wandering freely around her kitchen eating our food or that of our cats. So for this reason alone, I tend to keep my ants in close confinement.
Try when and wherever possible to keep your ants away from direct sunlight, and please remember to cover your Formicarium with something to exclude the light when you are not observing their behaviour, as although ants are fine with light, in the wild the nest is alway in darkness underground or covered by stones or vegetation. It is fascinating to watch ants going about their daily activities, digging tunnels and foraging for food. If you have any brood (eggs, lavae or pupae [i.e. "baby ants"] ) present in your ant colony, then you will see nurse ants caring for them. If you only decide to keep a few worker ants to study, and not have any functional queen present, then keep around 20-30 as an ideal number. Ants are social insects, and while a single ant can function alone, she does better with some of her sisters around to help out.
Think of an army with only 1 soldier, it wouldn't win any wars; and "Many hands make light work" the saying goes. So it is with ants, the more workers there are, the more easily and faster the work gets done; and although you may think a worker ant is always busy working, they do like to rest just the same as you or I do.
What medium is best to use?
Ant keepers often talk about what is the right kind of medium (soil type) or set up to keep ants in?
Some ant keepers prefer to use a Ytong (aerated concrete blocks) nest, while some like plaster nests or test tubes. Others like to keep their ants in sand, or a fancy mix that may come supplied with a set up that they buy.
Ask yourself what do ants nest in under natural conditions in the wild?
Around 95% of all ant species nest in good old fashioned soil, which let's face it, Mother Earth has supplied in abundance in whatever country or continent you happen to live in?
Okay, so some ants nest in wood or make nests from leaves or even their own living bodies; but the vast majority live as nature has provided, in nothing more than excavated networks of soil based cities.
Ants are not normally born into a glass test tube, a plaster nest or a nest made from concrete. Of course it isn't always easy to provide the exact same soil as the ants live in naturally, as ants which come from other countries may nest in a soil type which is completely different from that which is found in your garden; but if you add a little extra humus (leaf mould) or peat, or sand in the case of desert dwelling ant species, then many ants will adapt perfectly to ordinary dirt as long as it is kept a bit damp.
Just remember that while it might be fine to raise a colony in a glass test tube, this is not the ideal place for keeping them in long term; and while most ants do very well in an artificial nest, it does make them a lot happier to do what they would do in the wild; and that is to dig out their own nest to suit their own requirements for that species/genera, so please do consider this fact when keeping your ants in a long term set up.
Formicariums I use for my ants.
Most people who visit this site will probably wonder, and ask themselves this question. "What does he keep his own ants in?"
Well I must be honest and say, whatever I find the most suitable and convenient set up for the particular species I am wanting to keep in it. However, to avoid confusing people out there who may think some of the set ups shown elsewhere on this site, which are used by ant collectors other than myself; I thought it would be a good idea to place some pictures of the kind of set ups I am currently using, as well as ones I am also considering using in the near future!
Ant Tanks.
You can use plastic or glass fish tanks, or the kind of plastic tanks sold for keeping small spiders or frogs. Never go too large for the species you want to keep, but on the other hand don't go too small either, as ants do like to have a reasonable space to live and forage in.
Again keep small ants in a smaller set up, and larger ants in a bigger one which will provide more space. Beware that ants can climb up glass or plastic walls, and so may escape unless you can find ways of preventing this. I have found that Messor ants are very good in tanks, as they tend to not climb the walls. Whereas Formica run up and out as fast as you put them in, even across any barrier that may be in their way. Though Camponotus seem less inclined to do this, even though they can!
I recently bought these 2 very sturdy plastic tanks, which are of a nice size for homing a medium sized ant colony, as they are 8 inches long and 4" wide with a depth of about 6" ( 1 inch is 2.5cm).
Ant Worlds.
I have found these set ups very good for keeping smaller ants, such as Lasius, Myrmica or Tetramorium; but less so for larger ants like Camponotus or Formica. I would also suggest that they are not really suitable for ants such as Messor, Myrmecocystus or Pogonomyrmex species. The reason is, the walls are quite narrow and while a small species queen can move and turn easily between them, a larger ant can not, even if the species has small workers.
The largest queens I have tried out in an Ant World were Formica fusca, and they only just managed to move about. However for smaller queens and their workers, they are great. Although very tiny workers can sometimes squeeze their way out through the air holes in the top of the set up; but on the whole they are fairly escape proof and safe.
This type of ant farm can be purchased from here} http://www.interplaydirect.co.uk/ant-world-1-p.asp
Making a Plaster Nest.
This method for making a nice and really useful nest was the idea of Luke Goddard, a member of Ant Hill World forum, and comes with pictures to explain how to make it. Below is Luke's guide to making a plaster nest.
A plaster nest is a very good way to keep a colony, no matter how big or small. They are also quite easy and cheap to make, costing no more than £10 for the materials. Also they are good for studying the ants nests as you can see everything. There are quite a few things you must consider before making one though, such as:
Where - You need somewhere to have the thing!
What - You need to know what you are keeping in it to determine sizes.
Why - Will you design it to look stylish, to be good for the ants or easy to make?
How - How are you going to use it, will there be more basins or only the nest?
Once you have decided these you can feel free to design your nest, you don't need to make a plan but remember: to fail to prepare is to prepare to fail. Make sure the ants will actually live in it, they really will not will not 4 foot wide chambers or a swimming pool will they? So keep it realistic.
If you keep to around the width of a pencil for the tunnels and the chambers to range from around the size of a 50p coin and around three times that size then it should be successful. How large the whole thing becomes is completely your choice, just think about how large your colony is going to be, where you are going to keep it etc.
Materials}
I have listed here everything you will need for building, and some places you can get them from, with approx prices:
Plaster - This is probably one of the easiest to get hold of. You can get it from most DIY stores such as Homebase or B&Q. Most types of plaster will work but try to avoid the under cost plaster as it will be very rough and will not be as effective to use. You will want to go for multi use or the finishing coat plaster (i have used the finishing coat). A bag of this will not be too expensive.
Glass - This is just a sheet of square glass to act as a lid/window. You can get this from loads of places. I personally buy them in the form of a large picture frame and then take the glass out, this will only cost a few pounds from a cheap shop like Wilkinson's. Take note of the exact one you brought in case you glass ever needs to be replaced.
Plasticine - You will need to create a mould for the plaster and Plasticine is usually the best thing to use for this. You can use other things if you really want like blue tack, play-doh or maybe some objects you could mould around. I found that the best offer is in Toys 'R' Us and is a 'Plasticine activity bucket' and is what i use. It costs around £5 which is not too steep as it can be re-used as many times as you want.
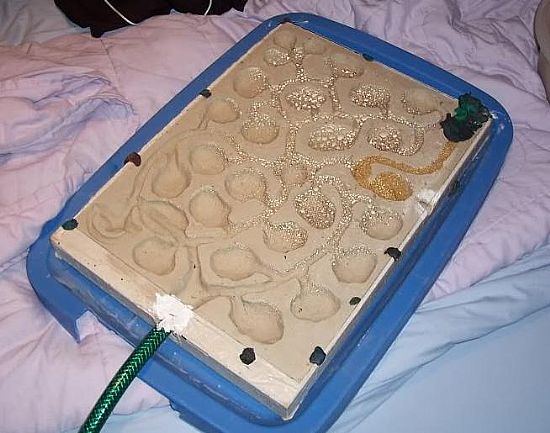
These are only the core things needed to create the nest, but also other things could be used for accessories, like as you can see from the picture further down in this page, i have a piece of hose pipe which i use to get water into the nest.
The Making}
Once you have all your materials its time to make. I have made a step by step here with pictures to help. Hope it guides you well.
1) Firstly you will need to make your mould. Take your piece of glass and using Plasticine (or whatever you decided to use) start to build the negative of what you want you nest to be. NOTE - Before you start putting your Plasticine on it is a very good idea to coat the glass with cling film first or grease it in someway, i didn't one time and the glass cracked and snapped when i tried to get it out.
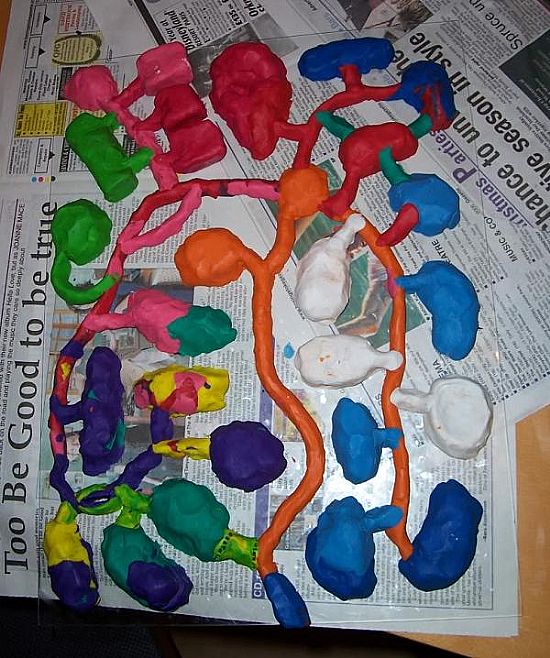
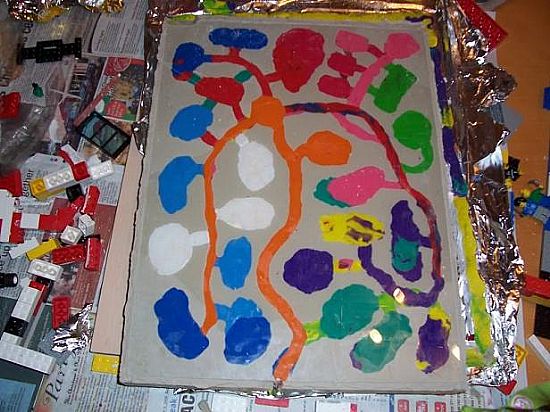
2) Now you should have something which looks like this:
Make sure there is a way out (like at the bottom of the above picture) if you plan to attach it to another basin.
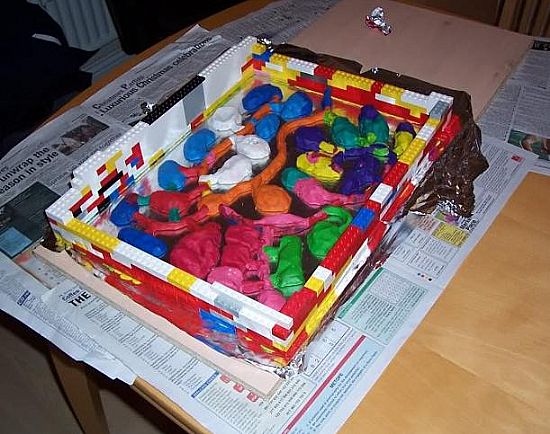
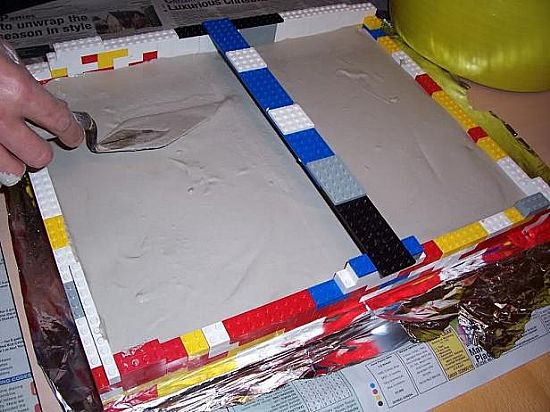
It is now time to setup and get ready for the plaster. If you have a board big and strong enough I would do it all on that. Lay down some newspapers to protect the surface and also something water resistant like cling film or kitchen foil.
Now you need a 'wall' to keep all the plaster in once you pour it in. I decided to use some Lego blocks for mine but you can do lots of things, such as using some planks of woods or maybe putting it in a box etc. I would recommend leaving a small gap of around 5mm on each side so that the glass has a 'slot' and will not move once in use.
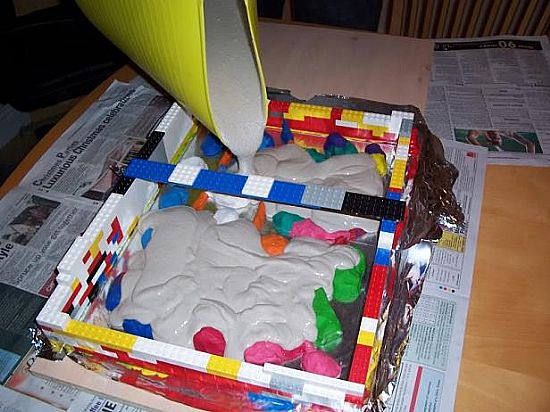
3) Now it is time for the plaster itself. Mix up what you think will be enough using the instructions on the packet. Then you just simply pour into your mould, some can be quite thick so make sure it gets everywhere. Get it up to the top of the wall if you can, but don't let it overflow!
4) You now need to smooth out the top so that it will have a flat bottom. Either use something like a trowel to smooth it yourself or, if you used a board to make it on, just shake the board gently and it should eventually all be level.
5) The plaster needs to set now, although it may only say it will take around 2 hours to dry on the packet, it is likely to take longer as it will be thicker than what it is supposed to be used for. I would leave it overnight if i were you to make sure it is really set before taking it apart.
6) Once set there is not much left to do. Start by taking the walls off around the nest and then flip it over. You should have something like this:
7) This part of the process is worth being very careful with. You must now take the glass off. Be very gentle when doing this so that you do not snap it, if you used cling film or have greased it, it should come off with ease. Once this is off it is the simple process of getting the Plasticine out. Use a knife or some other tool or just your hands if you like to get it out.
Give yourself a pat on the back, your now done. You may want to give it a clean, especially the glass, before putting anything in there. It's good to put some sand in places so that the ants are more likely to settle well. I hope you made it well and enjoyed it.
My thanks to Luke Goddard for this great step by step guide on how to make a Plaster Nest.
