PRACTICE AT HOME
Here we go guys when your at home wondering what to do look here for some training exercises drills and skills. Remember before you start any activity to warm up first.
A good warm up meets three important objectives...
1. Decreases the risk of injury.
2. Increases agility, skill, power and performance.
3. Allows players to mentally prepare and focus on the game or session at hand.
A cold muscle is stiff and rigid. Sudden twisting, turning and stretching can place greater tension on muscles and connective tissue than they can handle...
Warming up and stretching the active muscles in football can decrease the risk of strains, sprains and muscle tears.
Include some light, general aerobic exercise - jogging, skipping, running backwards, side stepping etc. at the start. Avoid explosive movements at this stage and any sudden turning and twisting actions.You can then move onto to some light stretches...Focus on the groins, hamstrings, quads and calves. Try doing some dynamic stretches - making circles with the arms and ankles, gently kicking the air as if to kick a ball, turning from side to side heal kicks knee lifts and so on.
static stretches Here are some other general, but important guidelines to bear in mind before you start your stretching routine..
• Do NOT hold a stretch that is in anyway painful. It should feel tight and that tightness should diminish as you hold the stretch.
-
Breath! Avoid holding your breath as you stretch as this can raise blood pressure and leave you feeling dizzy.
-
For optimal results try to stretch every day or at least 3-4 times a week.
-
Hold each stretch for 20-30 seconds. "Shake out" the limb and joint and repeat for a total of 2 to 3 sets.
-
static stretching should not be used in a warm up dynamic is best and static at the end in a warm down.
Here are some static stretches
 Two Leg Hamstring Stretch
1. With both feet together and legs fully extended, reach forward with both hands towards your toes.
2. Tuck your chin towards your chest to increase the stretch. 3. Keep your toes pointed towards the sky.
 Hamstring Split Stretch
1. Bending on one knee, extend the other leg out in front of you.
2. Reach with both hands towards your outstretched foot.
3. Keep your toes towards the sky and tuck your head to increase the stretch. Remember to breathe!
4. Repeat for the opposite side.
 Lying Quadriceps Stretch
1. Lying on one side grasp your ankle and pull your heel towards your buttocks.
2. Keep your back straight and the other leg bent.
3. Do not grab your foot. Grab just above the ankle joint (the bottom of your leg).
4. Keep the thigh in line with your body. To increase the stretch push your hips forward (only a slight movement).
5. Repeat for the opposite side.
 Classic Quadriceps Stretch
1. Standing one leg, grab your opposite ankle and pull your heel into your buttocks.
2. Your bent knee should sty parallel with your standing leg rather then being pulled behind.
3. Push your hips out to increase the stretch and remember not to grab the ankle joint.
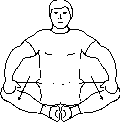 Sitting Groin Stretch
1. Sit with knees bent at 90 degrees.
2. Place the soles of your feet together to 'splay' your knees outwards.
3. Gently use your hands or elbows to push your knees downwards.  Standing Groin Stretch
1. Stand with your legs wider than shoulder width apart.
2. Shift your weight onto one side as you bend your knee.
3. Reach with one hand towards your outstretched foot.
4. You should feel the stretch right down the inside of your outstretched leg.
5. Repeat for the opposite side.  Lower Back Stretch
1. Sit with the legs straight out in front of you.
2. Bend the right knee so the sole of your foot is flat on the ground.
3. Turn your upper body towards your right knee and place your right hand on the floor for support.
4. Place your left forearm on the outside of your right knee and gently pull your knee towards you.
5. Resist with your knee and left hand to feel the tension in your lower back.
6. Repeat for the opposite side.
 Standing Calf Stretch
1.Using a wall or bar to support you, place one leg outstretched behind you.
2. Keeping the other leg bent lean against the wall to apply pressure to your beg leg.
3. Make sure you keep your back heel flat on the ground.
4. Repeat for the opposite side.
 Chest & Back Stretch
1. This stretch can be performed kneeling or standing. Take your boots off if you kneel.
2. Clasp your hands behind your back, keeping your arms as straight as possible.
3. Try to straighten your arms and raise them.
4. From this position bend forward from the waist also tucking your head towards your chest.
5. Hold this position for the recommended amount of time.
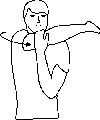 Shoulder Stretch
1. Place one are outstretched across your chest.
2. Place the hand or forearm of your other arm on your outstretched elbow to apply pressure.
3. Gently pull your outstretched arm closer to your chest, keeping it as straight as possible.
Don't expect results overnight. It can take up to 6 weeks to see measurable improvements. Be persistent - they will come.Finally, consider testing yourself prior to starting a stretching program then again after 6 weeks
Strength Training
Strength training now plays a major role in football However, simply lifting weights with the traditional "3 sets of 10 repetitions" approach is not an efficient way to spend training time. football requires a balance of explosive power and muscular endurance. Some players may benefit from increasing their lean mass but even they should focus on converting much of their strength into footballers -specific power.I find that circuit training can cover all the needs of power endurance and core stability.
Popular Core Strength Training Exercises
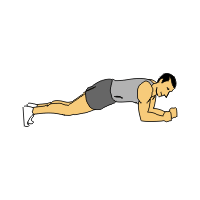 Prone Bridge
In a face down position, balance on the tips of your toes and elbows while attempting to maintain a straight line from heels to head. This exercise focuses on both the anterior and posterior muscle groups of the trunk and pelvis.
Lateral Bridge 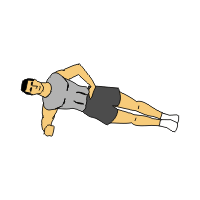 Start on your side and press up with your right arm. Form a bridge maintaining a straight line from your hand to your foot. Rest on your elbow to increase the difficulty. This exercise focuses on the abdominal obliques and transversus abdominus.
Supine Bridge
Lying on your back, raise your hips so that only your head, shoulders, and feet are touching the floor. The supine bridge focuses on the gluteal muscles. Stronger gluteals help maintain pelvic control.
 Russian Twists
1. Start by sitting on the floor with hips and knees flexed to approximately 90 degree angles.
2. Grasp a medicine ball or small dumbbell and swing it to the right and left as you keep the hips from rotating with the shoulders.
3. The arms are not perpendicular to the torso, but instead, kept low, near the thighs, as the medicine ball is swung to each side.
 Good Mornings
1) Stand with feet shoulder width apart with knees slightly bent (at 20).
2) Start position: Grasp bar with overhand grip shoulder width apart. Back should be straight in a neutral position.
3) Bending at the hips, lower bar to approximately knee height. Keep knees bent at 20 throughout movement.
4) Return to start position.
5) Remember to keep back straight - movement should occur at the hip. To facilitate this, shift glutes back as if ready to sit down. Knees should not move forward beyond the toes.
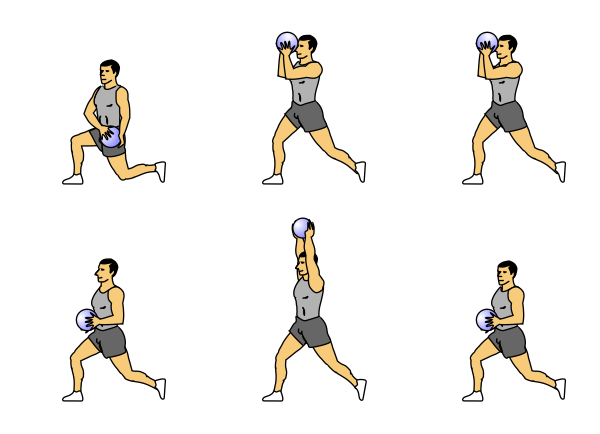 Dumbell Lunges with Crossover
1) Start position: Stand with feet hip width apart. Grasp DB's and hold out in front of body.
2) Step forward 2-3 feet forming a 90 bend at the front hip and knee. DO NOT allow front knee to extend past the big toe - may cause injury. As you are lunging swing dumbbells across body towards the hip.
3) Pushing off front foot, return to start position with legs and dumbbells.
4) Remember to keep head and back upright in a neutral position. Shoulders and hips should remain squared at all times.
5) Watch for proper knee alignment - do not let front knee extend past big toe or deviate laterally or medially. Back knee should not come in contact with floor.
Other excellent core stability exercises include:
Speed Training Drills
Drill #1 - Bounding
This is a plyometrics exercise. Along with a strength training program, plyometrics will help to improve your sprinting power.
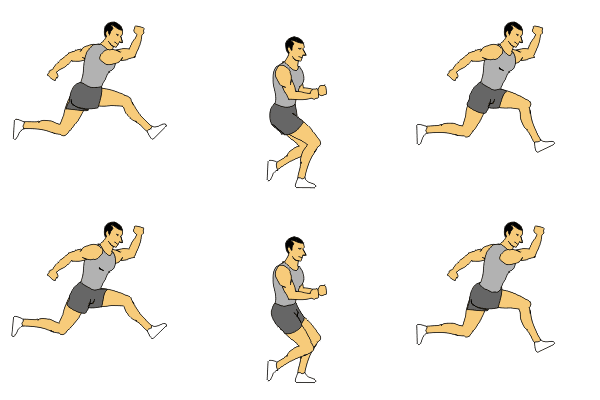 1. Jog into the start of the drill for forward momentum.
2. After a few feet, forcefully push off with the left foot and bring the leg forward. At same time drive your right arm forward.
3. Repeat with other leg and arm.
4. This exercise is an exaggerated running motion focusing on foot push-off and air time.
Drill #2 - Alternating Strides
Speed training drills like these help to develop foot speed and co-ordination. 1. Set up a series of cones in a straight line. The first 10 cones should be about 1 meter/yard apart. The next 10 should be 2 meters/yards apart.
2. From standing start sprint the total length of the cones taking one step between each marker.
3. The cones close together will encourage faster, shorter strides. You can gradually decrease the distance between cones as you progress. Walk slowly back to the start to recover.
Drill #3 - Alternating Starts
The basis of these speed training drills is a 10-20 meter/yard sprint. You should focus on accelerating as quickly as possible by powering away with your arms and legs. If your sport involves reacting quickly from different starting positions (as most sports do) try to vary the starting position. Examples include doing a press up then sprinting, sitting on your hands, lying face down, doing 5 squat jumps before sprinting etc.
Drill #4 - Accelerating Sprints
This drill requires you to mark out distance of about 100 yards/meters where you can sprint in a straight line. You also need to mark a halfway point either with some landmark or a mark on the ground. Starting at one end, gradually accelerate to reach full speed at the halfway point and continue to sprint to the end. Slow down gradually to a jog, turn and walk/jog back to the start. Speed training drills like these help to develop speed and power endurance. Remember though the emphasis should be on the quality of the sprint so allow plenty of time to recover as you walk between sprints.
Drill #5 - Weave In/Weave Out
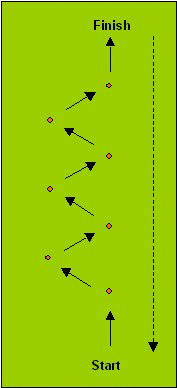 This is an excellent drill for developing lateral (sideways) agility.
1. Place 4 cones in a straight line about 3 yards/meters apart.
2. In between each pair of cones place another cone about 3 yards/meters to the left.
3. Sprint from one cone to the next touching each one with your hand.
4. Try to take quick side steps, rather than turning to face the marker and running forward.
If you do not own cones you can get them from pro direct or sports direct,if not use anything you have that will mark out the area.
Now your fit and strong you need ball skills try some of theses drills at home :
Ball skills
At home all types of ball skills can be performed from goal keepers drills, ball control, passing, turns,and shooting all you need is a ball.
Here are some you can try.
Ball Roll:

This is a skill which you can easily practise at home. lean against a wall with their shoulder as though it is an opponent. you should practise rolling the ball with the foot, moving around and getting into position to make a killer pass. You should do this drill again and again until you can keep your balance and learn to move around while in control of the ball.
A good first touch...
… gives a player TIME and SPACE to assess what to do next – for instance, pass, dribble or shoot
… ensures a time-wasting second touch isn’t required to get the ball out of the feet
… enables players to operate comfortably under pressure and in tight situations
Whereas a poor first touch…
… can take the momentum out of attacking play
… might result in LOST POSSESSION
The two types of control
1. Cushion control – taking the ‘sting’ out of the ball by pulling back the controlling surface on impact. This has the effect of ‘cushioning’ or absorbing the pace of the ball so that it drops at the feet.
2. Wedge control – by making the controlling surface, say the sole or outside of the boot, more rigid, the ball is ‘wedged’ between it and the ground. This is used when a player wants to force the ball downwards or into space so they can move onto it.
Basic soccer skill tips
- Move into position to intercept the ball early.
- Select the controlling surface early and place it in the ball’s path.
- Stay balanced using the arms.
- Watch the ball carefully to judge its direction and speed.
- Keep the head steady.
- Be relaxed.

What can you control it with? Anything!
-
Inside of the foot - Plant the supporting foot 45-90 degrees to the path of the ball. Control the ball with the arch of the free foot.
-
Outside of the foot - Used when the ball is travelling across in front of the player. Just reach forward into the ball’s path.
-
Sole of the foot - Raise the toes slightly above the heel. Used in dribbling for stopping before changing direction.
-
Instep - For when the ball’s falling from a steep angle. Stretch the ankle and cushion with the ‘laces’ by bending the knee and ankle on contact.
-
Thigh - Aim for about halfway up the top of the thigh, although the inside is good for stopping balls flying past.
-
Chest - May involve arching the back slightly, bending the knees and even jumping.
-
Head - Use the forehead, just below the hairline
Try this with a friend but if you are on your own use a wall.step back from the wall around 10 yards and pass the ball at the wall, the harder you hit the ball the faster it will come back.For higher body control chip the ball or even use the chance for practice your throw -ins. Remember more space more time,so when you get better move closer.
Here Is the technique on throw-ins:
THE SIDE DRAG:
side drag gives your players a skill to hold on to the ball and tease and dummy the opposition players.
REMEMBER, REPETITION PRACTICE IS THE KEY AND THE YOUNGER THE PLAYER THE BETTER
Using the right foot drag to the left
With the sole of the right foot on top of the ball, the player performs 3 or 4 ‘sideways’ drags of the ball, figure 1, always using the right foot; he drags to the left, planting his foot down to the ground after each action. Quick feet, speed and control are the key.

Push the ball away to the right
The progression is to dummy by dragging the ball left, but just roll your foot over the ball, planting it on the ground then quickly using the outside of the same foot (right), push the ball away to the right, figure 2.
Beat a player:
Beating players is an art, but you can help your team by telling them how to do it. They have to watch which leg the opponent is using and where his balance is to take advantage of the situation.
Tacklers often jump straight in and make it easy to go around them but the clever ones wait and jockey until they can make the tackle.
Use this technique
The defender starts out with balanced footing. But in frame two he raises one foot off the ground. If he raises his foot that is further away from the ball, you move out. If he raises his foot that is nearer to the ball, you move in. Get it? You’re “attacking” his supporting foot.
Let's look at how to teach the Cruyff Turn, which is a great move to bamboozle defenders.

Now try practicing some heading

1. Watch the ball
2. Keep eyes open
3. Head the ball with the forehead
4. Aim for the middle of the ball
ll
 Plockton Youth Football | sitemap | log in


 Two Leg Hamstring Stretch
 Hamstring Split Stretch
 Lying Quadriceps Stretch
 Classic Quadriceps Stretch
 Sitting Groin Stretch
 Standing Groin Stretch
 Lower Back Stretch
 Standing Calf Stretch
 Chest & Back Stretch
 Shoulder Stretch
 Prone Bridge
 Start on your side and press up with your right arm. Form a bridge maintaining a straight line from your hand to your foot. Rest on your elbow to increase the difficulty. This exercise focuses on the abdominal obliques and transversus abdominus.
 Russian Twists
 Good Mornings
 Dumbell Lunges with Crossover
 1. Jog into the start of the drill for forward momentum.
 This is an excellent drill for developing lateral (sideways) agility.


