
Automatic transmission
Notes

Easytronic layout
Learning to drive in an automatic can be so much easier than in a manual car, with most pupils reaching test standard in less time, learning to drive can be a lot less expensive. However, a candidate passing their test in an automatic vehicle will be issued with a license restricting them to automatic vehicles only.
Easytronic Layout
N = Neutral R = Reverse. Between + and - is Drive and gears can be manually overiden by changing up (+) or down (-)
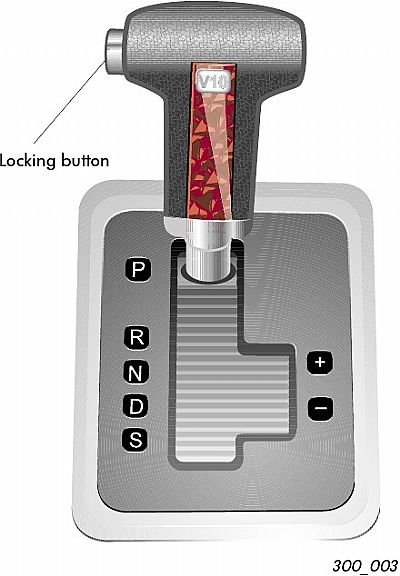
Standard Layout
many manufacturers are moving towards "Easytronic" type gearshifts.
FOOT CONTROLS
There are only two foot controls, Accelerator (gas pedal) on the right and the Brake which is on the left. Both are operated with the right foot only. Most automatics also have a footrest up on the far left where the left foot can be kept out of the road.
HAND CONTROLS
There are three main hand controls. Steering wheel and handbrake, same as a manual, then a “Selector Lever”.
The selector lever in the majority of automatics has four basic positions: P - Park, N -Neutral, D - Drive and R - Reverse. In addition a couple of “lock up” gears are usually provided: 2 and L or 1. Or of the “Tiptronic” variety where there is a sequential, clutchless manual selection of gears alongside the auto as in the above diagram and 2012 Ford Fiesta. Discuss these and any different layouts with your instructor.
The lever itself cannot be moved between some of these positions without pressing a safety button incorporated on the lever to prevent accidental selection.
Park. This position is used when the vehicle is parked to prevent it rolling away in the event of handbrake failure, only to be used when parked, do not select when driving!
Reverse. This position is used when needing to manoeuvre the vehicle backwards, do not select this position unless the vehicle is stopped.
Neutral. Normally located between Reverse and Drive. This position disengages the gears as it would in a manual vehicle. On most makes, it is only possible to start the engine with the lever in Neutral or in Park or with the footbrake on; otherwise the car could lurch forwards or backwards when started.
In the unlikely event that your engine stalls, hold the car on your footbrake while you get the lever back into Neutral promptly. That then enables you quickly to re-start the engine and re-select Drive (or Reverse) to get you moving again.
Drive. This is the normal driving position, gear changes occur automatically as required. When you select Drive before moving off, the gearbox automatically selects 1st without actually engaging it, then, as you accelerate for moving off, the coupling of the engine to the selected gear becomes made, and transmission of power to the driving wheels is achieved progressively - just as it would be with a properly operated manual clutch. After that the gearbox changes itself to 2nd as soon as the proper speed is achieved, and so on. It will also allow for extra weight being carried, or whether you are driving uphill or downhill. Downward changes are automatically made as you slow down.
2. This position is a held gear and could be used when negotiating a long, steep downhill gradient, this helps keep the speed down without too much overuse ( and overheating) of the brakes. It may also be used in a properly planned overtaking manoeuvre where a lower ratio is required for more acceleration.
1 or L. Another lower held gear This will prevent the gear changing up automatically, which may result in the vehicle ‘running on’ and increasing speed when this is not required, for example in severe weather conditions where snow or ice and mud etc would cause wheel spin.
Kickdown. When immediate maximum acceleration is required the ‘Kickdown’ facility can be used, this is engaged by pressing the gas pedal down sharply, overcoming the built-in resistance. This down shifts the gears to the most suitable for maximum acceleration. When the accelerator pedal is released the gearbox will automatically change back up again.
MOVING OFF IN AN AUTOMATIC
The first few times you move off, your vehicle should ideally be standing on level ground in a quiet area. The handbrake will be applied and selector in Park or Neutral. When safe, start your engine and allow to idle, your instructor, who will have previously briefed you on POM procedure will then instruct you to move off when it is safe to do so.
(a) Apply footbrake with right foot.
(b) Select Drive. (Move the lever as your Instructor will have shown you, from Neutral into Drive or if in Park then through Reverse and Neutral and into Drive)
(c) Release the handbrake but keep footbrake applied, otherwise car could move away before safe.
(d) Check your mirrors, and apply a signal if required when the conditions are good to go.
(e) Continue holding the car with the footbrake while you make your final checks to ensure that it is safe to move.
(f) If the checks confirm that you are still clear to go, move your right foot from the footbrake to the accelerator (gas pedal), and gently squeeze it. That will ensure a smooth start; you can then add acceleration gradually until you build up to the speed required.
Moving off downhill, uphill or at an angle can be dealt with by slight adaptations to the procedure. Downhill usually requires gentler than normal acceleration or, the retention of a little foot-brake control. Moving away steeply uphill normally requires a little gas and correct timing of the handbrake. Instead of holding the car only on the footbrake from (c) above, keep the handbrake on until (e). While you are checking that all is safe during (e), switch your right foot to giving slight acceleration - until you feel the car straining to go. For (f) you simply release the handbrake, increase your acceleration and away you go! If, for some reason, you can’t go straightaway, remove the acceleration until you are ready to begin again. Angled starts require correct coordination of the gas pedal, the footbrake and the steering wheel.
SLOWING DOWN AND STOPPING
Slowing down is achieved by first checking the mirrors and then coming off the gas, moving your right foot over to the brake and adding pressure as required. To come to a complete stop, you must first decide if an indication is necessary then use your footbrake as required to bring the car to a complete stop. DO NOT apply the handbrake until the car is stationary.
When stopped for any long period, it is better to apply your handbrake and select Neutral. This enables you to take your foot off the footbrake and relax.
It also safer to use your handbrake (and Neutral on longer stops) whenever you come to a stop at the front of a queue; at traffic lights or other junctions and especially at Zebra crossings or wherever pedestrians may cross in front of you and there is a possibility of your foot accidentally hitting the Gas pedal or where another driver could possibly shunt into the rear of your vehicle.
MANOEUVRING
Manoeuvring is a lot easier in a vehicle with automatic transmission. All you need normally do at (f) in the moving off routine above is partially release your footbrake. Standard automatics have “Creep and Hold” which allows you to move your car by operating the footbrake, however little, or slowly, you want. You can then adjust the amount of Creep you require by gentle touch on your footbrake pedal. If, at any stage, you should require more speed, you merely transfer your right foot across to the Gas pedal and squeeze as required.
Control can also be achieved in reverse by using your right foot, in the same way as for going forwards. Generally, if you have to alternate between forwards and backwards, you can hold the car on your footbrake while you move the selector, gently, from Drive via Neutral to Reverse, or vice versa. You won’t necessarily need your handbrake at each stop unless you are on a steep slope or for reasons of safety you require its use. Not all automatics are equipped with “Creep and Hold” check with your car’s handbook first.
Parallel Parking: Automatic
1. Pull up behind the vehicle and allow room to move off again.
2. Pull forward, using all normal moving off precautions and observations, keeping 60 cm. out from the vehicle in front and stop when your shoulder is in line with the farthest wheel (your wing mirror level with far end of car).
3. Select reverse gear. Make full all round observations and when safe, reverse straight back using ‘creep’ and/or a little gas, slowly until your rear wheel is in line with the end of the other vehicle (top of your back seat should be a good guide), pause, look round and reverse again slowly steering full lock to left. When kerb has disappeared out of rear window or car at “two o’clock”, pause, look round and reverse again steering full lock to the right. When car level with kerb, pause and straighten wheels to the left.
Left Reverse: Automatic
1. As you pass the junction, look into the new road you intend to reverse into, check for any hazards and, signal left if necessary, stop about 4-5 car lengths past the junction, 50/60 cm from the kerb with the steering wheel straight and apply the handbrake.
2. Select reverse gear and conduct an all round observation check. Decide if you need to control the car with the brake or gas (dependant on gradient). You now need to maintain Control Observation & Accuracy (COA) throughout the manoeuvre.
3. Release the handbrake and move the car at a consistent speed. Identify the point of turn, pause, full observations and if safe steer to the left at an angle that will match the shape of the kerb (usually one turn for shallow or full lock for sharp). If you can’t see the kerb in the left mirror you are too wide “STEER TO THE KERB”. When kerb appears in centre of rear window, straighten wheels and Reverse back about 3 - 4 car lengths, avoid stopping over any driveway.
4. Observation must be all round - 70% out the car rear window and 30% over the front and sides,
which includes the left mirror, though you must avoid over use of any mirror.
5. Avoid stopping during the manoeuvre unless other road users/pedestrians are approaching,
Try to keep the car moving at about a half walking pace.
Note: Avoid hitting the kerb. If it looks like the rear left wheel is very close, STOP and move forward around a metre to correct your position.
Bay Parking: Automatic
1. Drive past the bay, a short distance approximately a car width away, stop with wheels straight and, at an angle of 90 degrees to the bay you wish to park into, apply the handbrake if needed.
2. Select reverse gear and conduct an all round observation check. Decide if you need to control the car with the brake or gas (dependant on gradient). You now need to maintain Control Observation & Accuracy (COA) throughout the manoeuvre
3. At the point of turn (use your left shoulder - or marker as a guide) apply FULL left lock and, as the near side bay white line disappears from view, look into the left mirror to catch the far side (right side) white bay line.
4. When the far side (right side) white bay line becomes parallel with the car body,
straighten the wheel (one and a half turns right) and reverse back until the car is level, straight and inside the bay. Finish with the wheels straight, the handbrake applied and neutral (or park if remaining in bay).
5. Observation must be all round -70% out the car rear window and 30% over the front and sides, which includes the left mirror, though you must avoid over use of the left mirror.
6. Avoid stopping during the manoeuvre unless other road users/pedestrians are approaching,
Try to keep the car moving at slow walking pace.
