How to make a puppet
The three stages of a stop-motion puppet (1/2)

1. An armature is made. The internal structure of a stop-mo puppet. How to make one:
There are two routes you can go down....
1. A wire armature
2. A ball and socket armature
---------------A WIRE ARMATURE----------------
A stop motion puppet's armature all depends on your film, character, budget and skill.
A simple wire armature requires only annealed aluminium armature wire for the spine, arms, legs and neck, epoxy putty or similar (milliput), a drill and some pliers.
The next step up would be a B&S armature. Ball and socket armatures can be hard to make by your self, if you don't have the right equipment. Ball and socket armatures are more similar to a human skeleton with socket joints in the shoulders, elbows, knees, ankles etc. You can get a much smoother fluid movement with B&S armatures.
If you lack the equipment and time to make your own, there are many ready made armatures out there to buy. There are links at the end of this post, where you can buy them. These armatures are also more robust and easy to use, with no problems like breaking wires or wire un-twisting.
--------HOW TO MAKE A WIRE ARMATURE---------
A simple wire armature requires only annealed aluminium armature wire for the spine, arms, legs and neck, epoxy putty or similar (milliput), a drill and some pliers.
Firstly you need some alluminum wire. You can buy this at any decent art store or craft store.
Then you need some epoxy putty. This a clay like putty that dries ROCK hard after sculpting. The U.K type is called Milliput( google it)or if you can't get your hands on that just oven bake clay will be alright for a beginner.
If your puppet will have tie downs, you need nuts and screws. Tie downs are screws that come up from a hole in your set floor and screw into a nut in the puppet's feet. Then the screw is tightened against the floor with a wing nut.
To start off with you need to twist 2 strands of wire together. To do this quickly you can put 2 pieces side by side and screw the ends into the tip of the drill. Then you secure the other end with a vice or your foot and drill slowly, so they twist together.
The other way of doing this is getting one piece of wire, bending it in half, putting a pencil into the bent over area and wrapping the wire around so the pencil is secured in a loop. Then you would put the other end in pliers and hold the handles tight, or in a vice and then twist the pencil around.
You should make 4 pieces of twisted wire. One for the spine, one for the arms and one for the legs and one smaller looped piece for the head. Now you have to attatch them them together. You take the spine piece and unravel the two twisted wires untill you have two lengths of single wire coming from both ends. Then you bend the arm length in half like a U and wrap the pieces coming off the end of the spine around the bend. You do EXACTLY the same for the legs.
After that you could add epoxy putty or clay onto the chest and hip areas to build up those parts of the armature.
Type in STOPMOSHORTS in google and visit the first link. Go onto gallery at the top and then select tutorials in the options. There are a number of video tutorials there.
If you are not going down the route of making a ball and socket armature, make a well made wire armature.
A well made wire armature is better than an 'ok' ball and socket armature. Its easier than cutting up a jointed bionicle toy. The joints will most likely be bad for animation and 'pop'. Not moving smoothly.

2. I then sculpted the head from Sculpey polymer clay which bakes hard in the oven. The hair is synthetic and the eyes have black acrylic painted in their sockets for the expressionist look I was going for.
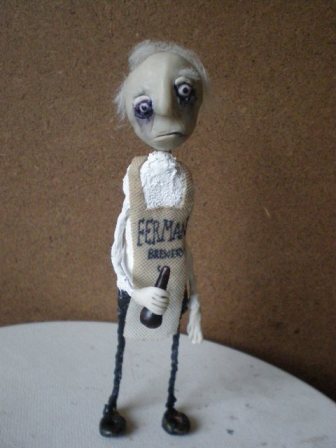
3. I then covered the armature with cushion foam to build-up the body then covered it with latex pigmented with white. The legs are black pigmented latex over the wire and the apron made from old fabric, written on with a Sharpe. The eyes were blackened even more to get the right graphic look. Eyelids were also made. Hands were sculpted in soft, un-baked Sculpey with a bottle sculpted from Fimo for his bottle.
I made this puppet a long time ago for practice, just something from the archives.
Please look at puppet tutorial 2.
The three stages of a stop-motion puppet (2/2)

Here is the armature and head completed. This puppet was damaged and never used, but is one of my favourites.

Here is the puppet clothed, with tartan shroud and scarf.
Be sure to check out all my tutorials and pictures!
Nofby
 Frame by Frame | sitemap | log in


